The art people line up for isn’t always a painting. It’s the room that glows, the tunnel that hums, the floor that shifts under your feet. This guide shows you what installation art actually is, how to get the most from seeing it, and how to plan one without blowing your budget or the circuit breaker. Expect plain English, credible references, and tools you can use today.
- TL;DR: Installation art is art you enter, not just look at; it’s immersive, often temporary, and designed for a specific space.
- How to experience it: slow down, read the cues, engage safely, and document with intent-not just for socials.
- How to create one: start with the site and audience, prototype small, budget honestly, and design for safety and maintenance.
- Where to see it: museums, biennales, light festivals, and public art programs often feature major installations.
- Big pitfalls: vague concepts, poor visitor flow, ignored power loads, and no plan for de-install or recycling.
What Installation Art Is and Why It Matters
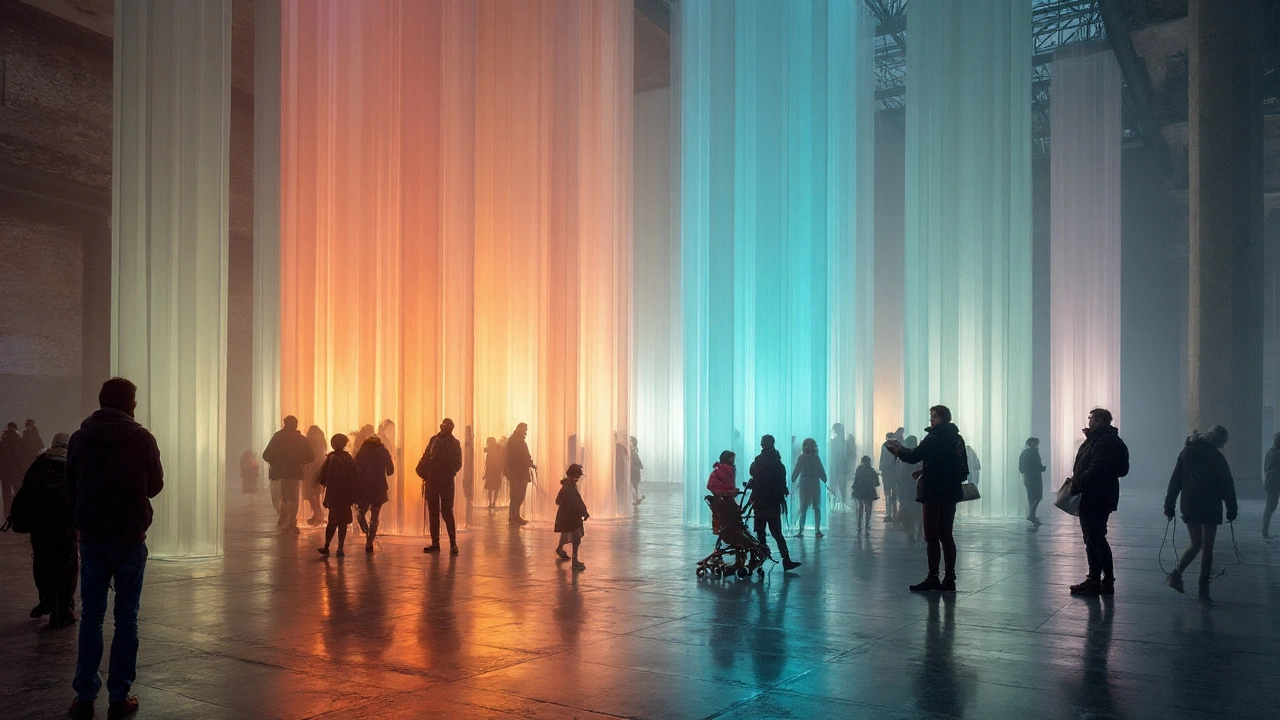
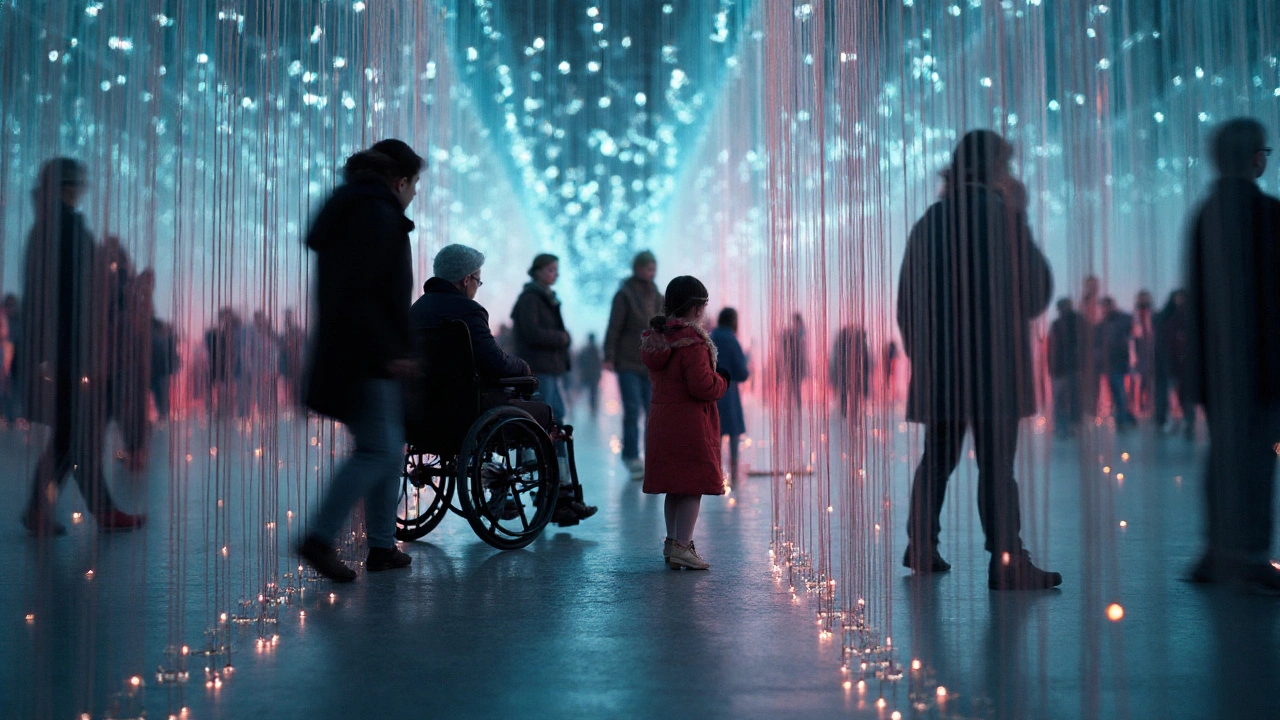
At its core, installation art is art that transforms a space into an experience. Instead of a single object on a pedestal, you get an environment to walk through, hear, touch (sometimes), or feel with your whole body. The space is part of the artwork-not just a container.
How we got here: in the 1930s, Kurt Schwitters built his evolving “Merzbau” rooms. In the late 1950s and 60s, Allan Kaprow’s Happenings blurred art and life, and Yayoi Kusama’s early mirror rooms pushed immersion. The 1970s brought video and sound installations via artists like Nam June Paik. In 2003-04, Olafur Eliasson’s “The Weather Project” filled Tate Modern’s Turbine Hall with a fake sun and haze; Tate’s annual report noted more than two million interactions. Since the 2010s, digital collectives like teamLab and artists like Refik Anadol have scaled immersive work with sensors, projection, and data.
Key traits you’ll notice in the field:
- Site-specific: designed for a particular place, often impossible elsewhere.
- Immersive: surrounds your senses-light, sound, scent, temperature, even air movement.
- Time-based: it changes across minutes or months; many are temporary.
- Relational: your presence matters-walk paths, triggers, and crowd flow are part of the piece.
Common formats:
- Spatial environments: rooms or corridors that shift perception.
- Interactive: sensors, buttons, or data responding to your movement.
- Sound/light: arrays of speakers and LEDs or projection mapping.
- Participatory/social: you build or perform the work by taking part.
- Environmental/land: outdoors, weather-aware, sometimes off-grid.
- AR/VR layers: digital overlays tied to real sites (growing fast since 2020).
Materials range from everyday stuff (plastic chairs, soil, water) to high-tech rigs (DMX lighting, LIDAR, microcontrollers). The meaning comes from how the elements transform the space and what they ask you to feel, question, or notice.
Why it matters now: audiences want embodied experiences, not just images. Museums report that immersive installations drive repeat visits and cross-generational engagement. This isn’t a trend; it’s a shift in how we relate to art and public spaces.
How to Experience Installation Art (And Actually Get Something From It)
If you’ve ever rushed through a blockbuster show and felt nothing but FOMO, try this method. It’s simple, repeatable, and respectful of both the art and your time.
- Pause at the threshold. Before you step in, note the room’s size, sound, smell, temperature. Your first read is about atmosphere.
- Scan for cues. Look for floor markings, visitor flow, and any instructions. If there’s wall text, read it now or later-decide based on whether you prefer context first or raw experience first.
- Walk the edges, then the center. Edges reveal hidden speakers, vents, mirrors, or projectors that explain the illusion. The center gives you the intended perspective.
- Give it time. Set a minimum: two full minutes stationary, eyes adjusting, before you move on. Many works unfold on loops of 3-10 minutes.
- Engage safely. Only touch if invited. If strobe warnings or fog are posted, take them seriously. Ask staff for earplugs if in doubt.
- Document with intent. Take three photos max, then put the phone away. Jot one sentence about what changed in the space or in you.
- Exit and reflect. Ask: What did the artist control? What did the crowd add? What part of the space did the work transform most?
Etiquette shortcuts:
- Don’t block sightlines for selfies; step aside after your shot.
- If you’re unsure about touching, assume “no.”
- Kids welcome, but check for loud sound or strobe warnings; many venues list sensory notes at entry.
- Wheelchair users: ask staff about alternative routes; many installations include ramps or platforms not obvious at first glance.
Accessibility and comfort:
- Light/sound sensitivity: look for strobe Decibel or lux warnings; ask staff for a content note if none is posted.
- Claustrophobia: choose a spot near an exit line of sight; avoid mirrored mazes during peak crowd times.
- VR/AR works: motion sickness can hit in under 5 minutes; try seated first.
Where to find the good ones:
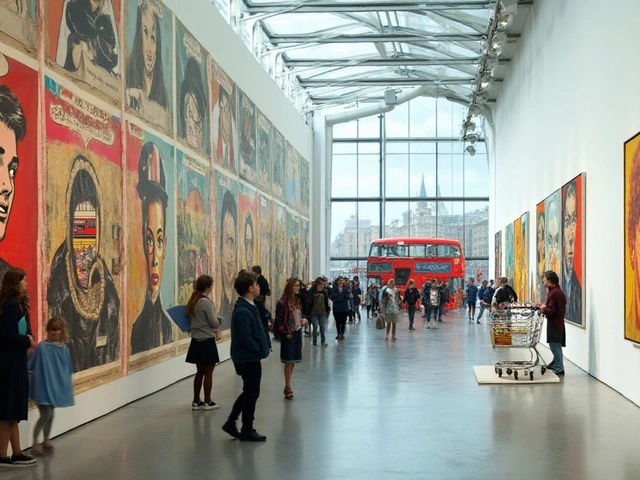
- Museums and contemporary art spaces with large galleries (e.g., institutions with turbine-hall style spaces, or those known for time-based media collections).
- Biennales and triennials: Venice Biennale, Biennale of Sydney, and regional festivals that commission site-specific works.
- Light and media festivals: think city-scale winter light festivals, projection events, or museum “late” programs.
- Public art programs: check your city council or transport authority; stations and plazas increasingly host temporary installations.
If you love the behind-the-scenes side, ask the gallery attendant about install time, tech used, and de-install plans. Many venues love sharing the build story; it helps you see choices, not just effects.
How to Plan and Create an Installation (From Idea to De-Install)
You don’t need a turbine hall to make an installation. You need a clear idea, a site, and a plan that respects people, time, and power. Here’s a practical path.
Start with constraints (they’re your friends):
- Site: dimensions, ceiling height, wall types, power outlets, noise limits, light leaks, access hours.
- Audience: capacity, dwell time, expected flow per hour, and whether you need timed entry.
- Safety: trip hazards, emergency egress, fire code, and material flame ratings.
- Budget: materials, fabrication, transport, insurance, crew, contingency (10-15%).
- Timeline: concept, prototype, approvals, fabrication, install, testing, maintenance, de-install.
Design workflow:
- Write the one-sentence promise. “In five minutes, visitors feel like they’re walking inside a thundercloud.” If your build decisions don’t serve that, cut them.
- Sketch the space. Make plan and elevation sketches. Build a quick cardboard or foam-core maquette, or model the room in SketchUp or Rhino.
- Prototype the core effect. If it’s sound, mock one speaker and a loop; if it’s light, test one LED bar in the actual darkness; if it’s scent, test dispersion with a fan.
- Map the flow. Where do people enter, pause, and exit? Where do queues form? Where will a pram or wheelchair turn?
- Calculate power and rigging. List every device with voltage and current; map cable runs and load distribution. Add 20% headroom and separate lighting from audio on different circuits if possible.
- Write the risk assessment. Identify hazards, controls, emergency procedures, and contact roles. Train your crew on it.
- Document the reset. If a staffer finds it at 10 a.m., how do they get it back to perfect by 10:05? Write step-by-steps and label switches clearly.
Handy technical heuristics:
- Power: P = V × A. In Australia, 240V mains; a 10A circuit ≈ 2400W. Keep total per circuit under 80% of rating.
- Sound: for continuous occupancy, aim under 85 dB at ear height; set peaks with a limiter.
- Light: avoid direct high-intensity LED glare; bounce or diffuse; warn for strobe over 5 Hz.
- Cable management: every cable taped or matted; no cable across exits; use cable trays for overhead runs.
- Time budget: simple immersive room = 3-5 days install with a 3-4 person crew; de-install is usually 50-70% of install time.
Permits and standards (check your local rules):
- Electrical: in Australia, fixed wiring must comply with AS/NZS 3000; portable equipment should be tested and tagged; licensed electricians for any modifications.
- Rigging: any overhead loads require rated hardware and a competent rigger; get a sign-off before public access.
- Public liability: venues usually require proof of insurance; community spaces may help arrange cover.
- Accessibility: plan step-free paths and a clear sensory warning; provide a quiet time if your work is intense.
| Budget Item (AUD) | Typical Range | Notes |
|---|---|---|
| Materials (lumber, fabric, LEDs, speakers) | $1,000 - $8,000 | Costs drop with reuse and rentals; price spikes for custom metalwork. |
| Fabrication/Shop Time | $1,500 - $10,000 | Complex builds need CNC/laser/welding; book early. |
| Equipment Hire (projectors, lighting, audio) | $800 - $6,000 | Weekend rates can be cheaper; ask for art/nonprofit discounts. |
| Transport (van hire, courier) | $300 - $2,000 | Factor load-in windows and lift dimensions. |
| Install Crew/Labour | $1,200 - $6,000 | 4 people × 3 days at $250-$350/day is common. |
| Insurance and Permits | $300 - $1,500 | Varies by venue and risk profile. |
| Documentation (photo/video) | $400 - $2,000 | Hire a pro on opening day; budget for editing. |
| Contingency (10-15%) | $600 - $3,000 | Protects against delays and swaps. |
Funding ideas: look at public arts grants (e.g., national arts councils or city arts programs), festival commissions, university galleries, and corporate cultural partnerships. Many applications ask for a concept image, a budget, and a risk plan-prepare those three early.
Sustainability tips that actually help:
- Design for disassembly: screws over glue; modular panels; standard fasteners.
- Rent or borrow tech; buy only what you’ll reuse in the next 12 months.
- Specify LED and low-power hardware; set devices to sleep overnight.
- Add a recycling plan to your proposal; venues notice and often choose greener projects when quality is tied.
Examples, Checklists, and Your Next Moves
Quick case snapshots to sharpen your eye:
- Yayoi Kusama, Infinity Mirror Rooms: tight spaces, mirrored walls, repeating lights; strict timed entry to control dwell time and protect the illusion.
- Olafur Eliasson, The Weather Project (Tate Modern, 2003-04): a giant sun made of monofrequency lamps and haze; a lesson in scale, light, and collective behavior.
- Cornelia Parker, Cold Dark Matter: An Exploded View (1991): a shed blown apart and hung mid-blast; precise rigging, one light source casting intricate shadows.
- Random International, Rain Room: falling water parts around you; heavy filtration, sensor precision, and strict footwear policy keep it safe.
- teamLab, Borderless/Planets: algorithmic projections and responsive floors; shows you how queues are choreography, not an afterthought.
- Julius Popp, bit.fall (MONA, Hobart): words formed by water droplets; data-driven pumps, water reclamation, and guardrails for splash zones.
Visitor checklist (save to your notes):
- Check for sensory warnings (strobe, loud sound, fog).
- Aim for off-peak times or timed tickets for immersive rooms.
- Give it two minutes before you judge it.
- Find the tech: where are the speakers, projectors, vents? It often reveals the idea.
- Take a couple of intentional photos, then look with your eyes again.
Creator preflight checklist (print for install):
- All devices listed with power draw; total per circuit under 80%.
- Cables taped/matted; no trip hazards; exits clear.
- Rigging rated and signed off by a competent person; safety bonds attached.
- Content warnings and capacity posted; staff briefed on scripts and resets.
- Emergency plan, first aid kit, and fire extinguisher visible to staff.
- Daily maintenance checklist: power on order, content check, interaction test, log sheet filled.
- De-install plan and reuse/recycle destinations confirmed.
Mini-FAQ:
- What’s the difference between sculpture and installation? Sculpture is typically an object; installation is an environment transforming the space around you. Some sculptures become installations at scale or with spatial intervention.
- How long do installations last? Museum shows often run 6-12 weeks; outdoor public works may run days to months; tech-heavy installations need daily checks.
- Can I make one at home or school? Yes. Use a spare room or a stage, clamp lights, small speakers, and found materials. Keep power simple and safe.
- How do I price a commission? Add direct costs + labor + contingency. If licensing an existing work, add a loan fee and tech rider; keep de-install costs separate.
- Where do I find grants? Check your national arts council, city public art office, and university galleries. Many have annual calls for proposals.
- How do I document it well? Shoot wide to show the space, then close-ups of materials and people interacting; capture a 20-30 second silent loop for social and a 2-3 minute edit for your portfolio.
Troubleshooting by scenario:
- Tech fails mid-show: identify the single point of failure first (power strip, network switch, projector lamp). Keep labeled spares and a power cycle order taped inside the cabinet.
- Crowds clog the entrance: add a second entry line, set a dwell-time guideline with staff, or insert a visual anchor deeper in the room to pull people forward.
- Audio bleeds to neighbors: switch to directional speakers or reduce sub frequencies that travel hardest; add soft surfaces behind walls.
- Condensation on mirrors or acrylic: reduce humidity, introduce gentle airflow, or add anti-fog coatings; clean during scheduled closures.
- Sensors misfire: check ambient light, recalibrate distance thresholds, and block reflective surfaces that fool IR.
- Power trips: stagger device startup; use soft-start where available; split high-draw devices across circuits.
Next steps depending on who you are:
- Student: recreate one effect from a favorite installation with a $200 cap-one projector, cheap fog, or a mono speaker experiment. Write the promise sentence first.
- Teacher: set up a class installation in a hallway; require a risk plan and a de-install hour; invite facilities in early.
- Independent artist: pitch a small, modular installation to a local gallery; offer a clear budget and a green de-install plan.
- Curator/producer: start with visitor capacity and staffing; pick works with clear reset procedures; test with soft opens before public launch.
- Community organizer: use rented lights and local choir/sound to transform a library or hall for one weekend; keep it accessible and free.
If you want to go deeper, look for museum publications on time-based media conservation, lighting design guides, and your region’s safety standards. Artists learn fast by building, testing, and asking the installers how they’d do it better. The space will tell you what it wants if you let it.